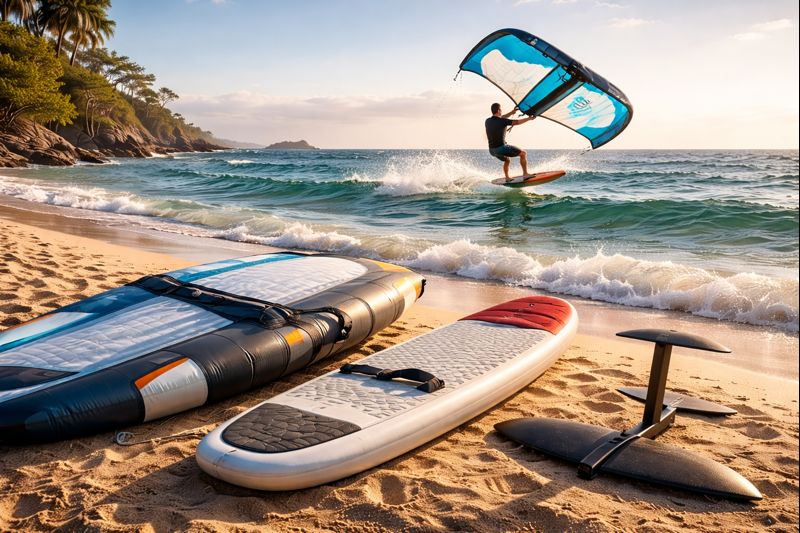
You saw wing foiling and it looked amazing. Now you want to try it. The sport combines surfing, kiteboarding, and windsurfing into something new. You hold an inflatable wing, stand on a board, and glide above the water on a hydrofoil. It feels like flying.
Getting started means buying the right gear. This can feel overwhelming at first. There are boards, wings, and foils to choose from. Each piece matters. Let me break it down so you can make smart choices.
Table of Contents
The Three Main Pieces
Wing foiling requires three key items. You need a board, a wing, and a foil. Each one affects how you ride.
The board floats you on the water. It has a connection point for the foil underneath. Boards come in different sizes measured in liters. More liters means more float. Beginners need extra volume to stay stable while learning.
The wing is what catches the wind. It looks like an inflatable kite with handles. You hold it above your head and use it to pull yourself across the water. Wings come in different sizes measured in square meters. Bigger wings catch more wind. Smaller wings work better in strong wind.
The foil sits under the board. It has a mast, a front wing, a rear wing, and a fuselage connecting everything. When you gain speed, the foil lifts you out of the water. This is when the magic happens. You stop splashing and start gliding.
How to Pick the Right Sizes
Your body weight matters most when choosing gear. Heavier riders need bigger equipment. Lighter riders can go smaller.
For boards, add about 30 to 40 liters above your weight in kilograms when starting out. If you weigh 80 kilograms, look for a board around 110 to 120 liters. This extra volume makes learning easier. You can downsize later as your skills improve.
Wing size depends on wind conditions and your weight. Most people start with a wing between 5 and 6 square meters. This size works in moderate wind, which is best for learning anyway. You can add a smaller wing for windy days and a larger one for light wind later.
Foil size involves the front wing area. Larger front wings, around 1500 to 2000 square centimeters, lift at lower speeds. This helps beginners get up on foil sooner. Smaller front wings go faster but need more skill to ride.
What to Look For
Quality matters with wing foiling gear. Cheap equipment can break and leave you stranded on the water. Look for established brands with good reviews.
Check the construction of boards. Most use a foam core with layers of fiberglass or carbon. Carbon costs more but weighs less. Lighter boards respond faster. For beginners, durability often matters more than weight savings.
Inspect wings for solid stitching and sturdy handles. The leading edge should inflate firm and hold pressure. Soft spots mean trouble. Handles should feel comfortable since you grip them the whole time.
Foils vary in material too. Aluminum foils cost less and handle bumps well. Carbon foils perform better but dent easier. Many riders start with aluminum and upgrade later.
Look at the connection systems too. Boards use different track systems for mounting foils. Make sure your foil fits your board. Some brands only work with their own parts. Others use standard connections that fit many options.
Finding Good Deals
Wing foiling gear can cost a lot. A full setup runs between $2,000 and $5,000 or more. Smart shopping helps stretch your budget.
Last season’s models often drop in price when new versions arrive. The differences are usually small. A one-year-old design still works great. Retailers mark these down to clear inventory.
Package deals bundle boards, wings, and foils together. These often save money compared to buying each piece alone. Check what comes included. Some packages skip important items like a pump or leash.
You can find quality wing foil equipments on sale at specialty shops. These retailers know the sport and can answer questions. They often have demo gear or returns at reduced prices.
Used gear is another option. Join online forums and local groups where riders sell their old stuff. Meet in person to inspect items before paying. Check for cracks, soft spots, and worn connections.
Before You Buy
Try before you buy if possible. Many shops rent gear or offer lessons with equipment included. A few sessions show you what sizes feel right. You might learn you need more float or less wing than you thought.
Talk to local riders too. They know what works in your area. Wind patterns and water conditions vary by location. What works in Hawaii might not suit your local lake.
Consider taking lessons first. Instructors teach proper technique and safety. They help you avoid bad habits that slow progress. The cost pays back in faster learning and fewer crashes.
Start simple. Buy one board, one wing, and one foil to begin. Add more sizes as you understand your needs. Many beginners buy too much too soon. Master the basics first.
Wing foiling rewards patience. The first sessions feel awkward. Then something clicks. You rise out of the water and everything changes. The gear investment pays off when you experience that first smooth glide. The sport delivers exactly what it promises. It really does feel like flying.